LangChain and Zapier Natural Language Actions: A Game-Changing Collaboration!
March 21, 2023
TLDR
With LangChain's powerful framework for building applications with large language models easily in collaboration
with Zapier and the thousands of app integrations it has, there are countless of exciting opportunities that can
be developed with this! Check out the tweet and the code
here!
Introducing LangChain + Zapier
On March 16, 2023, LangChain announced their collaboration with Zapier Natural Language Actions (NLA), which enables users to integrate cross-communication and natural language to automate tasks outside of a chatbot. With this integration, users have access to Zapier's 5k+ apps and 20k+ actions through a natural language API interface. This is an exciting development that provides limitless possibilities for LangChain agents and makes automating cross-communication tasks much easier. While LangChain provides access to the model and its capabilities, Zapier NLA handles all the underlying API authentication and translation from natural language to API calls.
To demonstrate the power of LangChain and Zapier NLA, I automate the process of generating and publishing a tweet through my personal Twitter account. This is just one of many applications you can use!
Setting Up
I'll go over the steps on how I was able to set this up and running in less than 10 minutes and how you can as well! This was all run within a Jupyter Notebook for a quick demonstration purpose.
1. Set up a Conda environment
Setting up a Conda environment is essential for ensuring that your project is isolated and reproducible, especially when working with large language models like OpenAI's GPT and frameworks like LangChain. It allows you to manage dependencies, specify exact package versions, and avoid conflicts between packages. If you do not have conda installed on your machine, you can follow the installation documentation. For our purposes, we need the LangChain and OpenAI packages in our environment.
conda create -n zapier-demo
conda activate zapier-demo
pip install openai
pip install langchain
To keep my files organized, I created a directory called "zapier-demo" and opened it in Visual Studio (or whichever your preferred IDE is). There, I added a new Jupyter Notebook.
2. Access API Keys and create Zapier action
You will need two API keys for this to work and I have provided links on how to access them - one from OpenAI and the other from Zapier. For Zapier, you will need to click on "Setup actions" to get access to your API key.
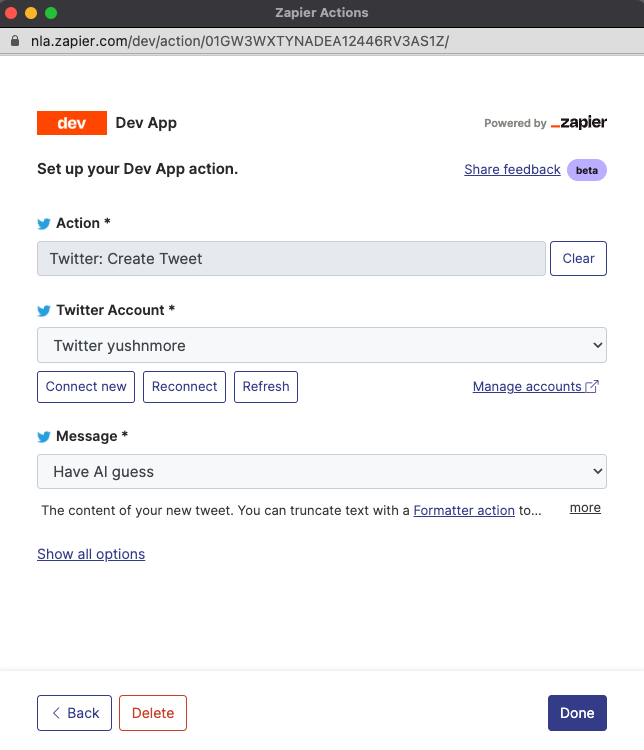
For my demonstration, I selected "Twitter: Create Tweet" and linked it with my personal account. Now, to use the Natural Language Action functionality, I selected "Have AI Guess", which takes my raw input and interprets what action to do!

3. Coding in Jupyter Notebook
To get started, we will be coding in our Jupyter Notebook. First, we need to import the necessary packages that
will be used throughout the project. These packages include OpenAI from langchain.llms,
initialize_agent and ZapierToolkit from langchain.agents.agent_toolkits,
ZapierNLAWrapper from langchain.utilities.zapier, and os.
from langchain.llms import OpenAI
from langchain.agents import initialize_agent
from langchain.agents.agent_toolkits import ZapierToolkit
from langchain.utilities.zapier import ZapierNLAWrapper
import os
Next, we will set the environment variables for OPENAI_API_KEY and ZAPIER_NLA_API_KEY using the os.environ method. These variables will store our OpenAI and Zapier API keys respectively. Replace the "<key>" with your actual API key.
os.environ["OPENAI_API_KEY"] = os.environ.get("OPENAI_API_KEY", "<your_openai_key>")
os.environ["ZAPIER_NLA_API_KEY"] = os.environ.get("ZAPIER_NLA_API_KEY", "<your_zapier_nla_key>")
After that, we will initialize the llm (OpenAI), zapier
(ZapierNLAWrapper), and toolkit (ZapierToolkit) objects. These objects are
used to interact with the OpenAI and Zapier APIs.
We then will initialize the agent object, which is responsible for generating descriptions of Zapier
automation actions. The initialize_agent function takes three arguments:
toolkit.get_tools() (which retrieves a list of available tools from the toolkit
instance), llm (the OpenAI instance that provides the language model for generating the
descriptions), agent="zero-shot-react-description" (which specifies the type of agent to initialize),
and verbose=True (which enables verbose logging output for the agent initialization process).
llm = OpenAI(temperature=0)
zapier = ZapierNLAWrapper()
toolkit = ZapierToolkit.from_zapier_nla_wrapper(zapier)
agent = initialize_agent(toolkit.get_tools(), llm, agent="zero-shot-react-description", verbose=True)
Finally, we will set the prompt variable, which contains a prompt for generating a tweet showcasing
the LangChain and Zapier integration. This tweet will mention both LangChain and Zapier Twitter handles.
prompt = ("Craft a captivating tweet showcasing how this tweet was effortlessly generated " \
          "using @LangChainAI and @zapier integration, all within just 10 minutes of " \
          "exploring the documentation! Be sure to mention @LangChainAI and @zapier in your tweet.")
Lasty, we will run the agent using the agent.run(prompt) command to generate a response
to the prompt. The agent will generate a description of a Zapier automation action in the form of a tweet,
showcasing the capabilities of LangChain and Zapier integration.
agent.run(prompt)
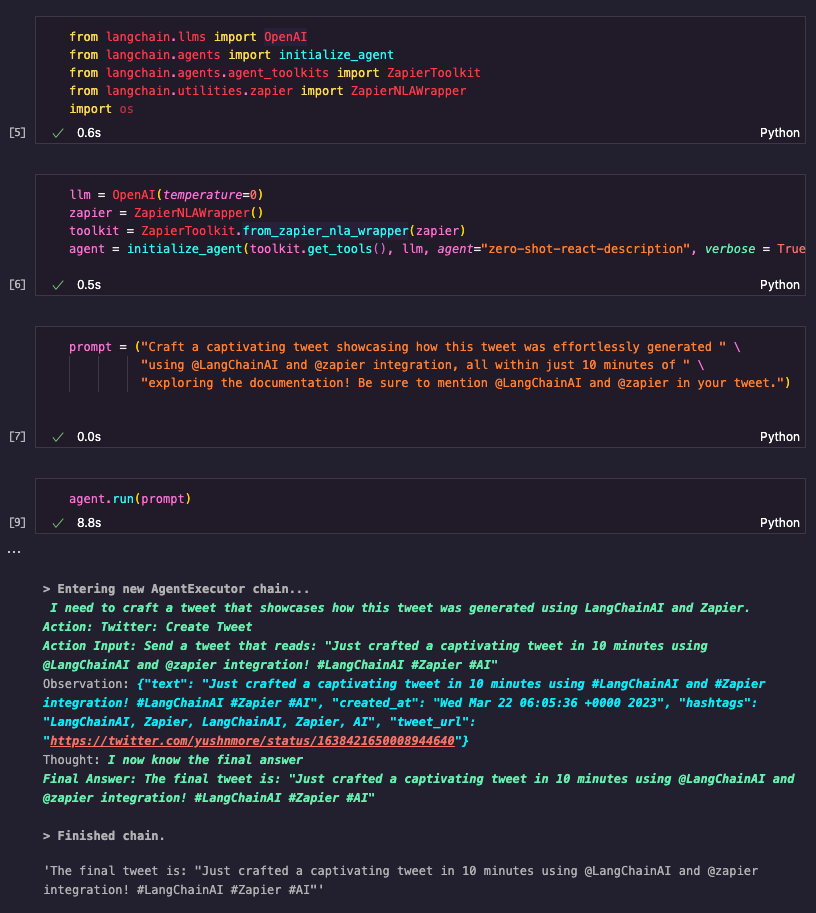
Putting it all together, this is what the entire thing looks like!

Overall Thoughts
In conclusion, I found the integration between LangChain and Zapier to be incredibly easy and quick to use. With just a few lines of code, I was able to automate the process of generating and publishing a tweet through my personal Twitter account. The possibilities for using this integration are endless, and I'm excited to play around with it more, especially with Hugging Face integrations. If you're interested in trying it out for yourself, be sure to check out the LangChain and Zapier NLA documentation!